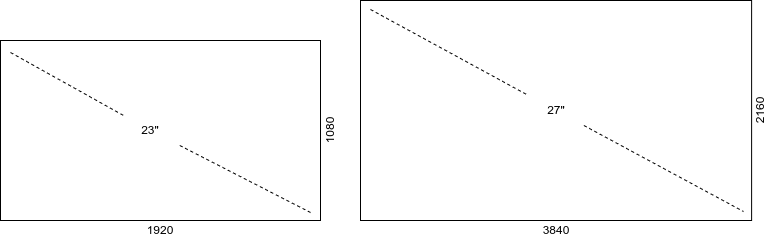
Many users’ desktop setups are comprised of several displays with different sizes, pixel resolutions and therefore different pixel densities (dpi). Unfortunately, many applications are not aware of so called ‘HiDPI‘ displays – displays, that by far exceed the pixel density of 72 dpi that we all have come to love so much. The result is that many elements on screen like windows, icons or fonts, are drawn uncomfortably small.
To counter this effect, the KDE desktop environment implements a global scaling factor that multiplies the default size of the elements. So if you set it to 150%, everything gets drawn 50% bigger than normal. The problem that arises here is that it is a global factor, and applies the same to all connected displays. This might be unwanted e.g. you have an additional display connected to your computer that does not have a high pixel density, as is the case for most standard Full-HD displays on the market.
So what do you do then? Either tolerate way too big elements on the non-HiDPI display, or set the scaling factor back to 100% and have a hard time reading anything on your nice HiDPI display?
Having had to deal with this challenge myself, I want to outline for you how I managed to get it working.
Set the scaling factor for your HiDPI display
First, go to System Settings > Display and Monitor > Display Configuration and set the “Global Scale” value to something that fits best to your HiDPI display. You do not need to consider your other display at this point.
Get the measuring tape out
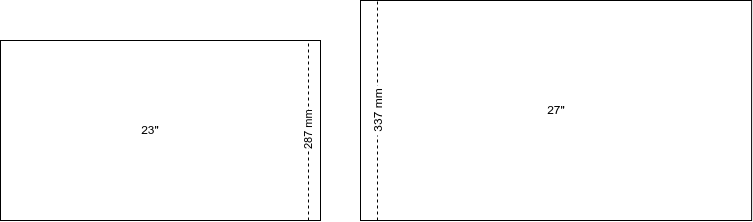
Measure the height of your HiDPI display and the height of your non-HiDPI display. In my case, the values are 337 mm and 287 mm. Make sure to measure the height of the display area, not the whole device.
A little math – but not too much
Once you have the measurements, it is time to do a few simple calculations. We are looking for the ratio of the screen heights. In my case it would look like this:
h_screen_one = 337 mm
h_screen_two = 287 mm
phys_ratio = h_screen_one / h_screen_two
which means:
phys_ratio = 337 mm / 287 mm
phys_ratio = 1.174 (rounded)
Because the elements on the non-HiDPI display are way too big right now, we will need to resize the display virtually. That is what the physical ratio is for. In the next step, we multiply the physical ratio with the displays’ resolution to retrieve the virtual resolution.
phys_ratio = 1.174 (calculation above)
res_virtual_width = 1920 * phys_ratio
res_virtual_width = 2254 (rounded)
res_virtual_height = 1080 * phys_ratio
res_virtual_height = 1268 (rounded)
Next, we need to find the scaling factor of the virtual resolution and the HiDPI-displays’ resolution. To do that, we simply divide the resolution width of the hidpi display by the resolution width of the virtual display. Using the resulting scaling factor, we calculate the target screen resolution by multiplying the displays physical resolution with the scaling factor:
res_virtual_width = 2254
res_hidpi_width = 3840
scaling_factor = res_hidpi_width / res_virtual_width
scaling_factor = 1.7 (rounded)

res_width = 1920 * scaling_factor
res_width = 3264
res_height = 1080 * scaling_factor
res_height = 1836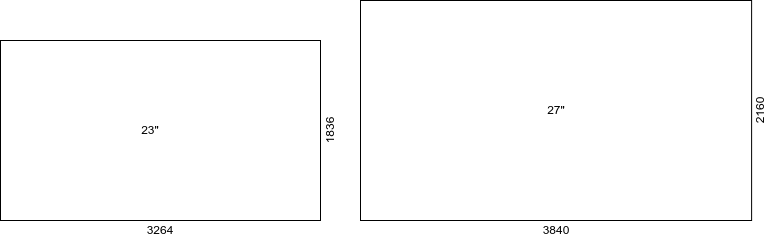
Using xrandr
Having calculated the necessary values, it is time to use them. To change the displays position, size and orientation, we are going to use xrandr, which should be available for most Linux distributions. Depending on your specific setup, it might be necessary to set different values for the screens’ positions. Keep in mind that the screens position is always defined as the position of its upper left corner. Also keep in mind that you need to work with your non-HiDPI screens’ virtual resolution.
In this case, the non-HiDPI display is connected via DisplayPort-0, the values are as calculated above.

xrandr \
--output DisplayPort-0 --scale 1.7x1.7 --pos 0x324 \
--output HDMI-A-0 --pos 3264x0
Thanks for the article and explanation! Do you also have the issue that, as soon as you run the XRANDR script, screen tearing appears? For me, I have no tearing when using the same scaling factor (1×1) on both displays, but it starts to get really bad once I change the scaling on the lower-DPI display.
Hey Lorenz, I always thought I was one of the very few having this issue, so the hacky suggestion I found on the internets never found their way into the blog post:
After calling xrandr and properly setting your displays scalings, call xrandr a second time and pass a scaling factor very close to 1 to your non dpi display, e.g.
xrandr –output DisplayPort-0 –scale 1.7036×1.7036 –pos 0x320 –output HDMI-A-0 –pos 3271×0 –scale 0.9999×0.9999
This did the trick for me.
-C
Very nice trick!
Do you know how to also get the wallpaper in the non HiDPI screen to conform to the new scale? Basically this would entail preserving the original wallpaper scale, while allowing the screen to scale when making the xrandr adjustment. Right now after scaling mine I have lots of black space on the bottom and left of my wallpaper image (only on the wallpaper NOT on the actual usable screen boundary). Thanks!
Right off the bat I do not know of a solution to that problem. Have to try that out myself first!
Thanks, it worked almost perfectly! I had one small issue, when resizing windows, they were ignoring the taskbar and so the bottom of the windows appeared below the taskbar. I fixed this by running `kquitapp5 plasmashell && kstart5 plasmashell`.
I’m glad that it worked out for you!
Thanks a lot. This worked for me!!!!
I am glad I could help! 🙂