Everyone who has ever had the joy of setting up a new computer knows the drill: Install the operating system (if none was preinstalled), install drivers, download and install application software, install plugins, copy user data and last but not least, configure everything. This can take many hours, if not days to get everything setup like it was before.
To make matters worse, if you reused an existing Windows license, you might even have trouble activating it – e.g. you activated it one too many times.
Fear not, for here’s one way to get the same Windows 10 installation setup on a different computer without going through the trouble of everything mentioned above. If done right, you will be up and running again in no time – disclaimer: of course, all of this depends heavily on the hardware and complexity of your device. Please do always make sure you have a proper backup of your data before you work on your system.
1: Uninstall all hardware specific driver software
In order for your Windows installation to become best friends with your new computer, we must unfriend the old one first. To do that, you want to uninstall all the hardware drivers that are specific to your old computer. This might be chipset and storage drivers, audio drivers, graphics card drivers and so on – you get the idea.
Using the windows menu, you just search for “Apps and features”
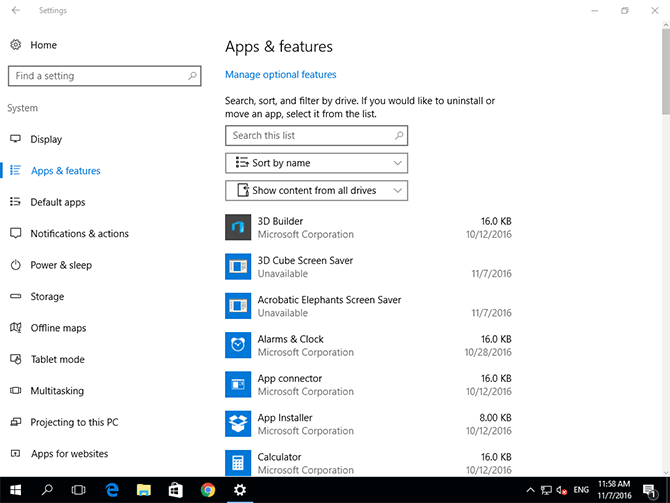
Once you are in the menu and the list items are showing up, you want to go through the list and uninstall everything hardware specific, one by one.
While you are doing that, you might be asked to restart your computer. Do not do that. Explanation: Once you restart your computer, sometimes the software you just uninstalled might get automatically reinstalled by the operating system. We don’t want that.
2: Uninstall all device specific hardware
After uninstalling all additional hardware specific software that was installed during the lifetime of your old computer, you want to uninstall the associated hardware itself.
You do that to detach all hardware specific components from your Windows instance, so that the next time you boot it up, it will be confronted with your new hardware. This is done simply to avoid any collision of old and new hardware drivers.
To do that, you invoke the “device manager” interface by using windows search.Sym
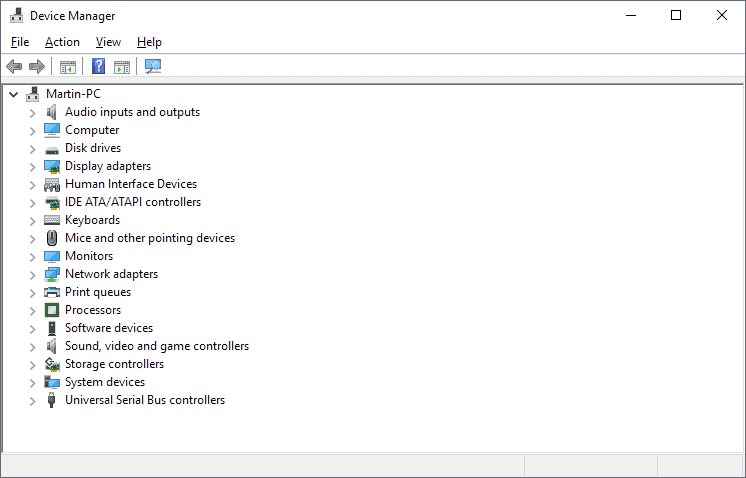
The hardware manager lists all the components that are currently attached to your computer. What we want to do next is to identify the devices that are specific to your old computer and uninstall them
We do not have to do that with every single component in the computer, but the following categories should get your special attention:
- audio-, video- and game controllers
- audio inputs and outputs
- bluetooth
- graphics cards
- controller cards
- cameras
- network adapters
- smartcard readers
USB and input devices such as keyboards and mice can be left out, since these are plug and play anyway and do not require special drivers or setup.
For each device of these categories you want to right click and select “uninstall device”. To be sure, enable “remove driver software for this device” and click “uninstall”.
Decline any notification asking you to reboot.
3: Preparing for reboot
Before you reboot, we want to put your old computer in a kind of preparation state. This is done in order to tell Windows that the computer will have to face a significant hardware change before the next reboot.
To do that open up the “run” window by simultaneously pressing windows key+R
Next, type in
sysprepand hit enter. An explorer window opens up, typically pointing to C:/Windows/System32/Sysprep
Execute sysprep.exe by double clicking on it.

This application prepares your Windows installation for hardware independence, which is what we want.
Leave “out-of-the-box-experience” as the selected mode and choose “shutdown” as shutdown behavior.
Once you click “OK”, Windows will prepare itself to be able to wake up with new hardware attached, and then shut down. This may take a moment, just be patient until it finishes.
4: Move SSD and boot
Now it is time to physically detach your boot drive from your old computer and to attach it to the new. I will not explain that here, since there are many very good tutorials out there on how to do that in general. Furthermore, my explanations may be too specific to my computer so that may be of very limited value to you.
Once you have connected your hard drive to your new computer, it is time to power it up. If you’ve done everything right, Windows will start to detect the hardware attached to your computer and set it up. After that’s done, Windows will ask you to create a new user. You will have to temporarily create a new user account to finish the installation. After the installation’s finished, you can safely delete the superficial user account without any problems.